

Are you tired of mediocre sound quality in your car and ready to upgrade to a killer sound system? Wiring speakers to a car head unit can be a daunting task, but with a few tips and tricks, you can turn your car into a mobile concert hall. Whether you’re a seasoned pro or a beginner, this guide will provide knowledge on how to wire speakers to a car head unit like a pro.
Wiring speakers to a car head unit involves connecting the speakers to the head unit, which is the central component of a car’s audio system. This can be done by running speaker wires from the head unit to each individual speaker and securing the connections with terminals or connectors.
Ensure to choose the right gauge of wire for the job and to make sure the speakers are compatible with the head unit. Additionally, it may be necessary to install an amplifier to boost the signal and improve sound quality. With proper planning and installation, wiring speakers to a car head unit can provide an upgrade to your car audio system.
How to connect car speakers to the head unit with RCA cables
Connecting car speakers to a head unit using RCA cables is a simple and effective way to improve the sound quality of your car. RCA cables provide a clear and strong signal, which results in better sound quality compared to using traditional speaker wires. With the right tools and a few steps, you can easily connect your car speakers to the head unit with RCA cables.
Tools Required:
- RCA cables
- Head unit
- Amplifier
- Wire stripper
- Crimping tool
Steps:
- Choose the right length of RCA cables: Select the RCA cables that are long enough to reach from the head unit to the amplifier and from the amplifier to each speaker.
- Strip the RCA cables: Using a wire stripper, carefully remove a small section of the insulation from both ends of each RCA cable.
- Crimp the RCA cables: Using a crimping tool, connect the stripped RCA cables to the amplifier and head unit. Make sure the connections are secure and tight.
- Connect the amplifier to the head unit: Connect one end of the RCA cables to the head unit and the other end to the amplifier.
- Connect the speakers to the amplifier: Using the same steps as above, connect the speakers to the amplifier using RCA cables.
- Test the connections: Turn on your car’s audio system and test the connections to ensure that the speakers are producing sound.
By following these simple steps, you can connect your car speakers to the head unit with RCA cables, resulting in improved sound quality and a better driving experience.
How to match car speaker impedance to head unit
Matching the car speaker impedance to the head unit is an important aspect of setting up a car audio system. Impedance is the measure of the electrical resistance of a speaker, and it is important to match the impedance of the speakers to the head unit to avoid damage to either the speakers or the head unit. Here are the steps to match the car speaker impedance to the head unit:
- Determine the speaker impedance: The impedance of a speaker is typically printed on the speaker’s label or can be found in the manufacturer’s specifications.
- Determine the head unit’s output: The head unit’s output impedance is typically found in the head unit’s specifications or can be found online.
- Match the speaker and head unit impedance: The speaker and head unit impedance should match in order to avoid damage to either the speakers or the head unit. For example, if the speaker has an impedance of 4 ohms and the head unit has an output of 4 ohms, they are considered to be a match.
- Consider using an amplifier: If the speaker and head unit impedances do not match, an amplifier can be used to match the impedance. This will also improve the sound quality and volume of the car’s audio system.
- Test the system: Once the speaker and head unit impedances have been matched, it is important to test the car’s audio system to ensure that it is functioning properly.
By following these steps, you can match the car speaker impedance to the head unit, resulting in improved sound quality, higher volume, and protection of your car audio system.
Can I connect more speakers to my car head unit?
Yes, you can connect more speakers to your car head unit as long as the head unit has enough output channels and the speakers have compatible impedances. The head unit should have an output channel for each speaker you want to connect, and the speakers should have compatible impedances with the head unit.
If the head unit does not have enough output channels, you can use an amplifier to add more channels and increase the volume. However, it is important to make sure that the amplifier and the speakers are compatible and that the total load on the amplifier does not exceed its maximum capacity.
How to wire 4 speakers to a 2-channel head unit
Wiring four speakers to a 2-channel head unit can be done, but it requires using an amplifier to increase the number of channels. Here are the steps to wire four speakers to a 2-channel head unit:
- Choose the right amplifier: Choose an amplifier with at least two channels and enough power to drive all four speakers. Make sure the amplifier is compatible with your head unit and the speakers you have chosen.
- Connect the amplifier to the head unit: Connect the RCA cables from the head unit to the amplifier, making sure that the right channel is connected to the right input on the amplifier.
- Connect the speakers to the amplifier: Connect the speakers to the amplifier, making sure that the positive terminal of each speaker is connected to the positive terminal on the amplifier and the negative terminal of each speaker is connected to the negative terminal on the amplifier.
- Test the connections: Turn on your car audio system and test the connections to make sure that the speakers are working properly. If there is no sound or the sound is distorted, check the connections and make sure that the impedances are matched.
- Configure the amplifier: Configure the amplifier to ensure that it is providing the right amount of power to each speaker. Make sure that the amplifier is not overloading the speakers and that the sound quality is good.
By following these steps, you can wire four speakers to a 2-channel head unit, resulting in improved sound quality and a better driving experience. It is important to follow the instructions carefully and make sure that all the connections are secure and tight to avoid damaging the head unit, amplifier, or speakers.
How to test car speaker wiring for continuity
Testing car speaker wiring for continuity is a simple process that helps to ensure that the speakers are wired correctly and that the audio system is functioning properly. Here are the steps to test car speaker wiring for continuity:
- Gather the tools: You will need a multimeter, a set of speaker wires, and a helper.
- Turn off the power: Turn off the car audio system and disconnect the battery to avoid any electrical shock.
- Set the multimeter to continuity test: Set the multimeter to continuity test mode. This will allow you to test if there is a complete circuit between two points.
- Test the positive speaker wire: Touch one probe of the multimeter to the positive terminal of the speaker and the other probe to the positive speaker wire. If the multimeter beeps or displays a reading, then there is continuity between the positive speaker wire and the speaker terminal.
- Test the negative speaker wire: Touch one probe of the multimeter to the negative terminal of the speaker and the other probe to the negative speaker wire. If the multimeter beeps or displays a reading, then there is continuity between the negative speaker wire and the speaker terminal.
- Repeat the process for all the speakers: Repeat the process for all the speakers to make sure that the wiring is correct for each speaker.
- Check for open circuits: If the multimeter does not beep or display a reading for either the positive or negative speaker wire, then there is an open circuit in the wiring, and the speaker will not function properly.
By testing the car speaker wiring for continuity, you can ensure that the wiring is correct and that the speakers are functioning properly. This will result in better sound quality and a better driving experience. If you encounter any problems with the wiring, it is recommended that you seek the help of a professional.
What is the difference between 2-channel and 4-channel head units?
2-channel and 4-channel head units refer to the number of audio channels the car stereo system can process.
- A 2-channel head unit has two channels and is typically used to drive front left and right speakers.
- A 4-channel head unit has four channels and can drive front left and right and rear left and right speakers, providing a full-range audio experience.
Furthermore, a 4-channel head unit provides a complete sound system compared to a 2-channel head unit.
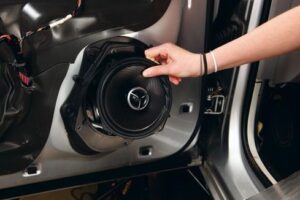
How to install car speakers with the head unit wiring harness
Installing car speakers with the head unit wiring harness typically involves the following steps:
- Disconnect the battery: Before starting the installation, disconnect the battery to prevent electrical shock or short circuits.
- Remove the old speakers: Remove the old speakers by removing any screws or clips holding them in place and disconnecting the wiring.
- Connect the wiring harness: Connect the wiring harness from the head unit to the new speakers. Make sure the positive and negative wires match up.
- Install the new speakers: Mount the new speakers in the appropriate location using screws or clips, if needed. Connect the wiring from the head unit to the speakers.
- Test the speakers: Reconnect the battery and test the speakers to make sure they are working properly. Adjust the volume and tone settings as necessary.
Note: The specific steps for installing car speakers can vary depending on the type of vehicle and the speakers being installed. It is recommended to consult a professional or the manufacturer’s instructions for your specific setup.
How to properly ground car speaker wires to the head unit
Grounding car speaker wires to the head unit properly is an important step to ensure clear, distortion-free sound. Here are the steps to follow:
- Locate the ground wire: The ground wire is typically a black or green wire and is connected to the metal frame of the vehicle.
- Connect the ground wire: Connect the ground wire from the head unit to the metal frame of the vehicle using a screw or a grounding point. Make sure the connection is tight and secure.
- Check the connection: Test the connection by turning on the head unit and making sure the speakers are functioning properly.
- Check for noise: If you hear any noise or static in the speakers, check the ground connection and make sure it is secure. If the problem persists, you may need to run a separate ground wire from the speakers to the metal frame of the vehicle.
Note: Always make sure to disconnect the battery before making any electrical connections to prevent electrical shock or short circuits. Additionally, it’s always a good idea to consult a professional or the manufacturer’s instructions for your specific setup.
How to diagnose speaker wiring issues in a car
Diagnosing speaker wiring issues in a car can be done by following these steps:
- Check the wiring: Inspect the wiring between the head unit and the speakers for any visible damage or fraying. Check the connections for loose wires or corroded connectors.
- Check for power: Turn on the head unit and check if the speakers are receiving power. If the speakers are not receiving power, there may be a problem with the wiring between the head unit and the speakers.
- Check the speaker wiring: If the speakers are receiving power but are not producing sound, there may be a problem with the wiring between the speakers and the head unit. Check the connections to make sure they are tight and secure.
- Check the speaker polarity: Make sure the positive and negative wires are connected correctly to the speakers. If the polarity is reversed, the speakers will not produce sound.
- Test each speaker individually: If one speaker is not producing sound, it could be a problem with that specific speaker or the wiring of that speaker. Test each speaker individually to isolate the problem.
- Consult a professional: If you are unable to diagnose the problem, consider consulting a professional for further diagnosis and repair.
Note: Always make sure to disconnect the battery before making any electrical connections to prevent electrical shock or short circuits.
How to wire car subwoofer to the head unit
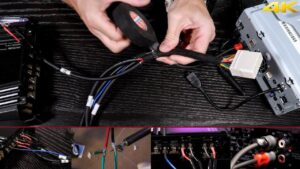
Wiring a car subwoofer to the head unit involves connecting the subwoofer to the amplifier, which is then connected to the head unit. Here are the steps to follow:
- Determine the wiring configuration: Check the wiring configuration of your head unit and subwoofer to make sure you have the correct cables and wiring.
- Connect the RCA cables: Connect the RCA cables from the head unit to the amplifier. These cables carry the audio signal from the head unit to the amplifier.
- Connect the power wire: Connect the power wire from the battery to the amplifier. This wire provides power to the amplifier.
- Connect the ground wire: Connect the ground wire from the amplifier to the metal frame of the vehicle. This wire grounds the amplifier to prevent any electrical interference.
- Connect the speaker wire: Connect the speaker wire from the amplifier to the subwoofer. This wire carries the audio signal from the amplifier to the subwoofer.
- Test the subwoofer: Turn on the head unit and test the subwoofer to make sure it is functioning properly. Adjust the volume and tone settings as necessary.
Note: The specific steps for wiring a car subwoofer can vary depending on the type of equipment you have and the wiring configuration of your vehicle. It is recommended to consult a professional or the manufacturer’s instructions for your specific setup. Always make sure to disconnect the battery before making any electrical connections to prevent electrical shock or short circuits.
How to wire car speakers in series or parallel
Wiring car speakers in series or parallel affects the total impedance of the system and affects the amount of power the speakers receive from the amplifier. Here’s how to wire car speakers in series and parallel:
- Wiring in series: Wiring speakers in series means connecting the positive terminal of one speaker to the negative terminal of another speaker, creating a chain of speakers. Wiring in series increases the total impedance of the system, reducing the amount of power received by the speakers. To wire in series, connect the positive terminal of the first speaker to the negative terminal of the second speaker, then connect the positive terminal of the second speaker to the negative terminal of the third speaker, and so on.
- Wiring in parallel: Wiring speakers in parallel means connecting the positive terminal of one speaker to the positive terminal of another speaker and connecting the negative terminal of one speaker to the negative terminal of another speaker. Wiring in parallel decreases the total impedance of the system, increasing the amount of power received by the speakers. To wire in parallel, connect the positive terminal of the first speaker to the positive terminal of the second speaker and connect the negative terminal of the first speaker to the negative terminal of the second speaker. Repeat this process for each additional speaker.
How to determine the speaker wire gauge for your car

To determine the speaker wire gauge for your car audio system, consider the following factors:
- Power handling capability of the speakers: A speaker with higher power handling capability will require a thicker gauge wire to handle the increased current flow.
- Length of the wire run: The longer the wire run, the thicker the gauge wire should be to minimize resistance and maintain adequate voltage.
- System impedance: The system impedance (measured in ohms) should also be considered when selecting a speaker wire gauge. Generally, lower impedance systems require thicker gauge wire.
As a general guideline, 18 gauge wire is suitable for systems up to 50 watts RMS, 16 gauge for systems up to 100 watts RMS, and 14 gauge for systems up to 200 watts RMS. It’s always best to consult with a professional or the manufacturer’s specifications for the most accurate information.
How to upgrade car audio system with the new head unit and speakers
To upgrade a car audio system with a new head unit and speakers, follow these steps:
- Determine the size of the new head unit and speakers. Check the car’s manual or do some research to determine the size of the existing head unit and speakers, so you can purchase new ones that will fit.
- Remove the old head unit. This typically involves disconnecting the wiring harness and removing any screws or mounting brackets holding the old unit in place.
- Install the new head unit. Connect the wiring harness to the new head unit and secure it in place using screws or mounting brackets, if applicable.
- Replace the speakers. Remove the old speakers and disconnect the wiring, then connect the wiring for the new speakers and secure them in place.
- Test the system. Turn on the car and test the new head unit and speakers to make sure they are working properly.
- Make any necessary adjustments. If the sound quality is not what you expected, you may need to adjust the equalizer settings on the head unit or make other changes to optimize the sound.
It’s recommended to have some experience with car audio systems and wiring or to seek the help of a professional to ensure the upgrade is done correctly and safely.
What are the different types of car speaker wire connectors?
There are several types of car speaker wire connectors:
- Spade connectors: these are small, flat metal connectors that slip onto the ends of the speaker wires and then get tightened onto the terminals of the speakers.
- Banana plugs: these are round connectors that fit into the speaker terminals, often found in higher-end audio systems.
- Pin connectors: these are small, cylindrical connectors that fit into the speaker terminals and are held in place by a locking mechanism.
- Bare wire connectors: some speakers have terminal posts that accept bare wire without the need for a connector.
- Twist-on connectors: these are connectors that screw onto the end of the speaker wire, making a secure connection to the speaker terminals.
- Terminal blocks: these are connectors that allow multiple speaker wires to be connected to a single terminal, which is useful when installing multiple speakers in a car.
It’s important to use the correct type of connector for the speakers being installed to ensure a secure and stable connection.
Recommended:
- Difference between sound and noise
- How to listen to music without wifi
- How to get rid of white noise in mic
Common mistakes to avoid when wiring car speakers to the head unit
When wiring car speakers to a head unit, it’s important to avoid these common mistakes:
- Mixing up positive and negative wires: connecting the positive wire to the negative terminal and vice versa can result in poor sound quality or even damage to the speakers or head unit.
- Using the wrong gauge of wire: using a wire that is too thin for the power handling of the speakers can result in a loss of sound quality or even damage to the speakers.
- Not using RCA cables: using a speaker-level signal instead of a line-level signal (using RCA cables) can result in poor sound quality and potentially cause damage to the head unit.
- Improperly securing the connections: not securing the connections between the wires and the head unit or speakers can result in loose connections that can cause static or noise in the sound.
- Not testing the system: not testing the system after making the connections can result in discovering issues only after the installation is complete, which can be more difficult and time-consuming to fix.
- Ignoring the polarity of the speakers: not following the proper polarity (positive to positive and negative to negative) can result in poor sound quality, reduced efficiency, and even damage to the speakers.
- Not using proper tools: using improper tools, such as pliers instead of wire strippers, can damage the speaker wires and result in poor connections.
It’s always recommended to seek the help of a professional or have experience with car audio installations, to avoid these mistakes and ensure a successful and safe installation.
Conclusion
If you want to learn how to wire speakers to a car head unit like a pro, then we have got you covered. Wiring speakers to a car head unit requires careful planning and attention to detail to ensure a successful and safe installation.
To avoid common mistakes, it’s important to use the correct gauge of wire, follow proper polarity, use RCA cables, secure connections, test the system after installation, and seek the help of a professional if necessary. By following these guidelines and avoiding common mistakes, you can enjoy improved sound quality from your car’s audio system.